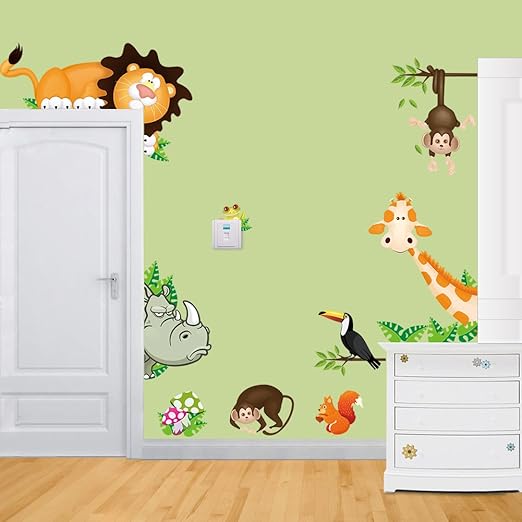
Thursday, August 25, 2016

What to do when your student's think the classroom bathroom is old?


So your kids's think that your classroom bathroom is creepy? You try to explain that our school is older and their are marks on the walls from other students but your one student refuses to go in there. Well, that's what happened to me this year. I have one student that has some behavior issues, ODD (Oppositional Defiance Disorder), and literally will yell that the bathroom is creepy and refuse to go. We tried other bathrooms in the school but the fan was too loud or there was something else that was wrong.

I decided to fix it. She loves My Little Ponies so I got these super cute wall stickers. Then of course I had to buy some non-girl stickers the boys won't refuse to go int there.

Rainbow Fox Forest Animals and Owls wall stickers Playing On Colorful Tree Removable Wall Stickers Home Decor stickers For Children's Room Nursery
Here are the acceptable "boy stickers'


The animal wall stickers can be found here!    The My Little Pony can be bought here!

Here are the My Little Pony Stickers
Just a little decoration
You can tell the last teacher tried too with the faded butterflies!


Monday, August 22, 2016

Emojis Table Points and Sight word Table Names!


Emojis are the cutest things ever!

So for my 3 out of 180 new things I want to do in my classroom, I decided to change out just tally marks for emoji table points. I love it so much and my students are so much more engaged. Sometimes I let them pick out their own emoji and they surprisingly don't take too long to do that. 


Emoji Classroom Management - Whole Group, Small Group or I

Click here to get the cute Emoji Management Upper Elementary Adventures on TPT

Blank ones rock!
So flipping cute!

I chose the blank ones so I can put my own sight word table names on every month and added the Velcro to make my life a lot easier. I change my sight words every week. Each week every table gets a new sight word.


I use sight words as table names each week. I hang them over the tables each week for more recognition. Each page is one sight word that I print front to back. By the end of the year, even my lowest kids know most of the sight words because they see and hear them on a regular basis.
Sight word Table Names
Click here for sight word table names!

Included:
-118 sight words. It's a combination of Dolch, Frys, and most kindergarten textbook sight words.
-written numbers 0-20 (2 per number). One just has the word and the other has the word plus a cute number.
-10 color words (2 per number). One just has the word and the other has the word and 3 pictures.

Enjoy!

Spanish Table Names coming soon!


Wednesday, August 17, 2016

Best Laminator EVER!!


So apparently when you get super excited about someone getting a laminator and you might have complained a lot about your new lamination policies at your school...your family gifts you a laminator. BEST GIFT EVER or a least for a teacher. Let me just tell you that I have put it to good use. First up, making schedule cards. I print them out every year and every year they get ruined. All the information is at the bottom of this post!

Purple Cows Hot and Cold Laminator, Includes 100 3 mil Hot Pockets, Assorted Sizes (3016c)
Purple cows Laminator..buy here


AmazonBasics Thermal Laminating Pouches - 8.9-Inch x 11.4-Inch, Pack of 100
Amazon lamination sheets...buy here

I love that my laminator is called Purple Cows...clearly made for an elementary teacher because it cracks me up every time. Now when I went laminator crazy, I used all the laminator sheets up. Instead of buying from the purple cows brand,  I bought the generic version from Amazon and it worked just fine based on price. If you can afford it I would buy from Purple Cows because they were very solid and heavy duty.


Schedule cards made by Carla Carroll..get them here


So easy to use
Schedule Cards {The First Grade Parade}
The Free schedule cards


Portable...awesome


Calm Down Corner

Calm Down Corner 

1-2 New Things out of 180

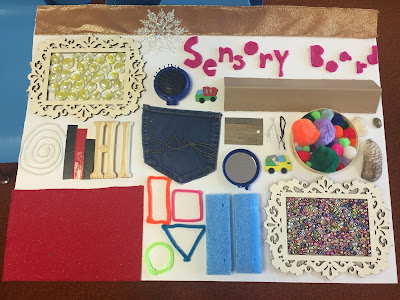
       So I'm on a mission to do 180 new things this school year to become a better teacher. My first challenge was to set up a calm down corner in my classroom. The class that I'm getting has several challenging students, they run out of the classroom, hide and have sensory issues. I wanted to create a safe environment the help them so first I created a sensory board. Most of it was on CLEARANCE!!!! I went to Michael's and JoAnn's and found things in the clearance section that I could use like marbles, beads, felt, wooden letters, twist ties. I also used things I already had in my classroom or at my house: pipe cleaners made into shapes, stickers, colorful cotton balls glued to a Brie container (so delicious), tile from home depot, packaging material, electrical tape, shells, string that I glued in a spiral. The only other thing I had to buy was more glue sticks for my hot glue gun, cardboard background, and 2 wooden frames in the Michael's Wood Aisle. My Sensory Board letters I made out of felt. I also had old Jeans I cut the pocket from and an old travel hairbrush that I broke in half so a mirror on one side and the prickely hairbrush on the other side. My recommendation when making one is to find stuff in your classroom, things around the house that you don't need that are different shapes and textures.
 
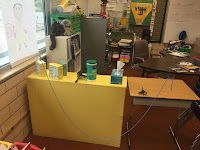
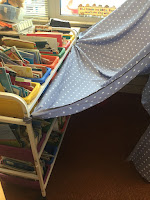
Next up...create a covered safe space. I made sure to put it away from any doors or to a loud center. I ordered a set of sheets from amazon but you could always get some fabric at JoAnn's Fabric. Click here for the sheets I got at Amazon. I hung part of it on the wall using a 3m hanger. Then I hung a string from the ceiling. I put a piece of yarn from the wall hanger and the string, so it looks more like a tent.
Tied the yarn from the wall to string from the ceiling

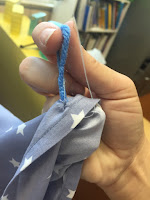
Make a hole to tie the yarn and string around
Tying away

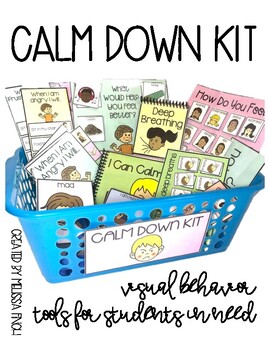
I also attached it to the nearest bookshelves by tying it around the ends. I'm not an engineer and I know there is a better way to hang it up, so I won't take it personal if you choose to make yours look completely different. Now for the best part I added some lights and a calm down kit. It's AMAZING! Just print and laminate..it's filled with great strategies and boards for your students. You can get it on TPT right here!
Calm Down Kit- Visual Behavioral Management Tools for Stud 
 Next, I put play-dough, a stuffed animal, squishy toys, a whiteboard plus marker, silencing headphones, and a book in a box for some extra calming relief. I also made a label and instructions that you can get at my TPT store for free to edit to your needs here. Voila!!! I'm done and I love it....hope you enjoy making one as much as I did.

The kid's pictures totally caputre this corner!
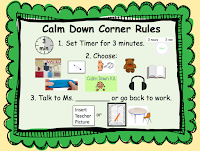
Editable to put in your own picture


Sunday, November 17, 2013

Fun Center

The center my students fight over this center, which is why I have to pick centers know because they love it so much. It's Mr. Potato head following directions.


I first bought my Mr. Potato Head from Amazon but they have just taken it off so I bought it for 17 dollars on ebay.

Students put together each potato by following the directions from each Mr. Potato head sheet. 

They look like this:

Some weeks I even let them just play with them if they have been super good!

You can buy it right here!

It's on sale for a week! Hope you enjoy it.

Thursday, November 14, 2013

New Crayon Day!

Ever heard of new crayon day? I hadn't of it either until a fellow teacher told me about it. When all crayons in your classroom are broken in little pieces... you announce new crayon day! All the old crayons are collected and new ones are given out. The kids are so excited to get new crayons.

I decided then to try and be crafty and melt the old bits into a new crayon.

Materials:
-old crayons
-silicone baking sheet

It took me forever to find one that I wanted. I ended up with a Bite size treat mold made for brownies at Michaels. But they are small enough and it worked well for me. You could also get stars or hearts.

Bake at 230 degrees for 20 minutes

 You do not need to spray with Pam or non-stick spray


This batch I added non stick spray and it was more dull than other batches!

Finished product. My kids are going to so excited.


Monday, November 11, 2013

Bringing Back Play dough!!

I love play dough. I love the smell, the colors, the feel, etc. So I wanted my students to enjoy it too to have another "break" from writing. This is so good for my students that have poor fine motor skills.
I found a recipe online that I could make in the the classroom since I have a microwave.

Kool aid recipe:
2 Cups Flour
1 Cup Salt
  2 Tablespoons Oil
   4 teaspoons Cream of Tartar
2 Cups Water
1 Package of kool aid

Mix all dry ingredients in a large bowl including the Kool aid. Combine the oil and water in a microwave safe bowl until it's almost boiling. Mix the liquid and the dry ingredients together. Once the mixture has cooled, knead the dough until it becomes smooth and soft.

I pulled a group of 6 or 7 students to come sit at the table with me. I read the instructions to them but they measure it out (with guidance). I did all the microwaving though because it is very HOT!

By the way it smells so good, so remind them not to eat it! 


I put the papers in a sheet projector and let them practice shaping the letters. Each group got some of the play dough they made to make the letters. I had to show the students how to roll it because some of them had never used play dough before.

Here is the alphabet paper I used!


I let the students take the paper and the play dough home for them to practice. You would have thought I have given them a hundred dollars they were so elated!